
QUICK TIP:
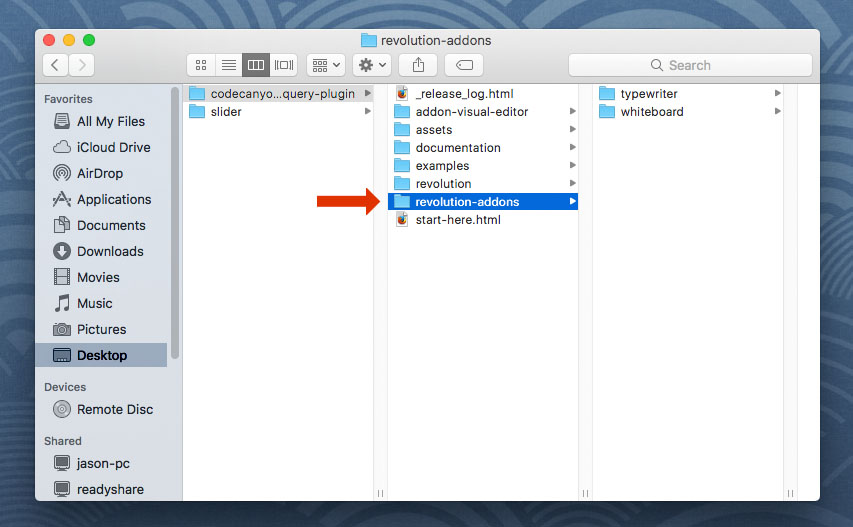
To get started with the Polyfold Add-On, first add the "revolutions-addons" folder into your production site:
Next, add the Polyfold stylesheet and script. The script should placed below all other scripts on the page.
<!-- POLYFOLD STYLESHEET -->
<link rel="stylesheet" type="text/css" href="revolution-addons/polyfold/css/revolution.addon.polyfold.css" />
<!-- POLYFOLD SCRIPT -->
<script type="text/javascript" src="revolution-addons/polyfold/js/revolution.addon.polyfold.min.js"></script>
Next, assign a variable to your slider's main settings script, and jQuery as shown in the following example.
var tpj = jQuery;
var slider = jQuery('#rev_slider_1').show().revolution({
/* ******************** */
/* SLIDER SETTINGS HERE */
/* ******************** */
});
Then initialize the Polyfold Addon:
var tpj = jQuery;
var slider = jQuery('#rev_slider_1').show().revolution({
/* ******************** */
/* SLIDER SETTINGS HERE */
/* ******************** */
});
/*
Instantiate the Polyfold AddOn for the top, bottom or both
The following is an example of how edges can be applied to both the top and bottom of the slider
*/
/* INCLUDE TO ENABLE TOP EDGE */
RsPolyfoldAddOn(tpj, slider, {
position: "top",
color: "#ffffff",
scroll: true,
height: 100,
range: "slider",
point: "sides",
placement: 1,
responsive: true,
negative: false,
leftWidth: 0.5,
rightWidth: 0.5,
inverted: false,
animated: false,
ease: "ease-out",
time: 0.3
});
/* INCLUDE A SECOND TIME TO ENABLE A BOTTOM EDGE IN ADDITION TO THE TOP */
RsPolyfoldAddOn(tpj, slider, {
position: "bottom",
color: "#ffffff",
scroll: true,
height: 100,
range: "slider",
point: "sides",
placement: 1,
responsive: true,
negative: false,
leftWidth: 0.5,
rightWidth: 0.5,
inverted: false,
animated: false,
ease: "ease-out",
time: 0.3
});
Settings Descriptions:
- "top"
- "bottom"
- true
- false
- Number
- "slider"
- "window"
- "sides"
- "center"
- 1
- 2
- 3
- true
- false
- true
- false
- Number (0-1)
- Number (0-1)
- true
- false
- true
- false
- "ease-out"
- "ease-in"
- "ease-in-out"
- "ease"
- "linear"
- Number
RsPolyfoldAddOn(tpj, slider, {
position: "top",
color: "#ffffff",
scroll: true,
height: 100,
range: "slider",
point: "sides",
placement: 1,
responsive: true,
negative: false,
leftWidth: 0.5,
rightWidth: 0.5,
inverted: false,
animated: false,
ease: "ease-out",
time: 0.3
});